How to Tweak a Pop Vocal Preset to Fit Your Voice
A vocal preset can be a useful starting point, but it should never be treated as a finished mix.
On This Page
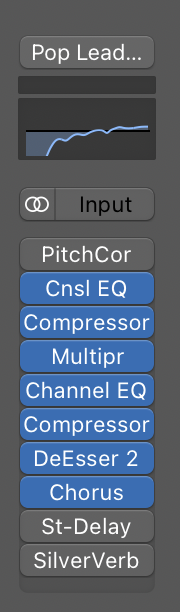
The goal is to make the singer easy to hear, keep the quiet lines present, and give the hook some size without pushing the lead behind a wall of effects. In this guide, I'm using a pop vocal preset as a starting point and showing how I would begin adapting it to a specific vocal.
You can do that with the stock tools in Logic Pro 11, but the same principle applies to presets made for other DAWs. I do not personally use this preset as my own vocal chain. This is a beginner-focused example of how you can take a pop vocal preset, such as a Rys Up Audio preset, listen critically, and adjust it to fit the actual voice in front of you. Start with a good take, keep each move small, and always listen with the beat playing.
Get the recording and level right first
Pick a take with the right feeling before you start building a chain. Edit obvious clicks, noisy gaps, and distracting breaths by hand where they actually pull attention. Do not erase every breath. A completely scrubbed vocal can feel less like a person.
Set a comfortable input level into the first plugin. If a loud phrase clips the recording, turning down a plugin later will not repair it. If one word jumps out, use clip gain or region gain before asking the compressor to catch the whole performance. That little bit of prep usually makes the rest of the chain work less hard.
Shape the tone without thinning it out
Open Channel EQ and listen for a problem before making a cut. In the vocal used for this example, the starting point felt a little thin, so I made a small EQ adjustment to bring more body back into the voice rather than simply following the preset exactly. A gentle high pass filter can clear low rumble, but move it up only until the noise is gone. If the chest of the voice starts to vanish, back it down. Presets such as the Rys Up Audio pop vocal presets give you a sensible starting shape, but the actual voice decides the final curve.
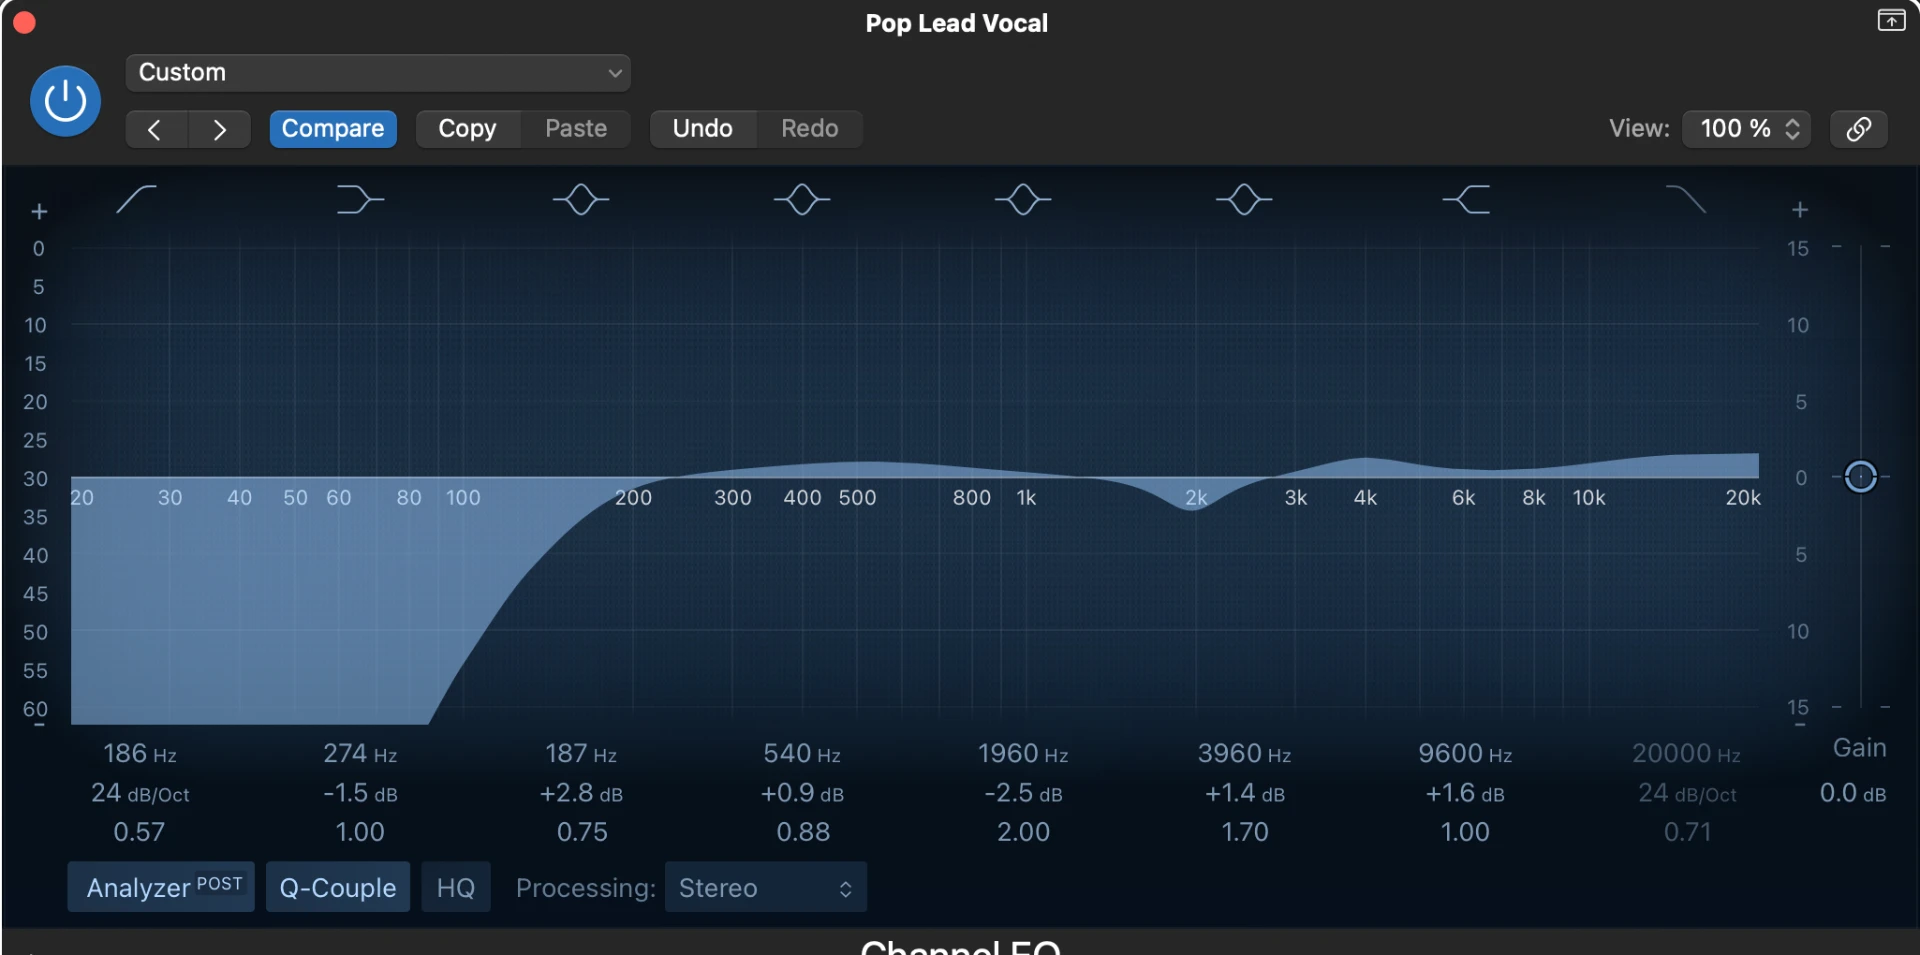
Low mid buildup can make a lead feel cloudy. A small, wide cut may help, especially when the kick, bass, keys, and vocal all crowd the same area. Harshness higher up is different. Sweep for the specific ring, make a restrained move, and compare at the same listening level. Do not copy a frequency from someone else's voice and assume it belongs on yours.
In Logic, Channel EQ's analyzer can show where energy gathers. Your ears still make the final call. A curve that looks clean is not the goal. A vocal that works in the song is.
Control the level in two calm steps
A pop lead often needs to feel steady without sounding pinned down. Start with Logic's Compressor on the lead. Set the threshold so the loudest phrases get controlled, then adjust attack and release while the full mix plays. If consonants lose their edge, let more of the front of the word through. If the compressor keeps pumping between words, ease the gain reduction or change its recovery. Presets like the ones from Rys Up Audio already include a compressor in the chain, so check how its settings behave on your vocal instead of trusting them as is.
After that, ride any phrases that still vanish. You can use automation or small region gain moves. One compressor setting should not be expected to fix every line of a performance. If the chorus needs a little more energy, draw that change where the chorus happens rather than forcing every verse word to the same level.
Check the vocal when you switch from solo back to the instrumental. Match the output level when you bypass the compressor. Louder can sound better for a second even when the processing itself is worse.
Deal with sharp S sounds before adding sparkle
Brightness helps a pop vocal cut through. It also makes sharp S and T sounds harder to ignore. Logic's DeEsser 2 can reduce those moments when they cross the threshold without darkening every word. Find the actual sibilant area in this take and use only enough reduction to stop it grabbing your ear.
Then decide whether the lead really needs more top end. Sometimes it does. Sometimes clearing a little space in the synths is the better move. Always check the brightest chorus line and the quietest verse line, not just one held note.
Give the hook space on sends
Put reverb and delay on aux returns so the dry lead can stay clear. Start with a short space for depth, then add a longer effect only where it serves the song. Use a send for a delay throw at the end of a line instead of leaving a busy delay on every word.
Keep the low end of the effects returns under control. If the reverb makes the lead feel far away, lower the return or shorten the tail before turning the dry vocal up. A hook can be wide and exciting without making the center blurry.
Doubles and harmonies should support the lead, not fight it. Edit their timing, lower their level, and pan or widen them with purpose. If they only matter in the chorus, let the verse be smaller. That contrast is part of the lift.
Save a starting chain, then make it yours
A preset is useful when it gets the routing and first decisions on the screen quickly. It is not a finished mix. The singer's microphone, room, tone, and arrangement still decide the EQ, compression, de-essing, and effects levels.
If you want an editable starting point, Rys Up Audio has pop vocal presets for several DAWs, including Logic Pro. You can use a preset like this to get a complete starting chain on screen quickly, but the important part is what you do after loading it. Check the exact DAW and plugin requirements for the preset you choose, load it at a conservative level, keep a copy of the dry vocal, and adjust each section while the real instrumental plays. I do not use these presets as my own mixing chains. The point here is to show beginners how to make a preset work with their own voice instead of expecting the preset to do the mixing for them.
Whether you start from a Rys Up Audio pop vocal preset or build the chain from scratch, print a version of the vocal that another engineer can hear, and keep the dry take too. That gives the next person a clear reference and room to change direction.
The last test is simple. Listen to the whole song at a normal level. Can you understand the verse? Does the hook lift? Does the vocal still feel like the same artist? If the answers are yes, stop adding plugins.
Ready to take your vocals further?
Send me your song and I'll personally mix your vocals. Clean, full and back within 48 hours.